

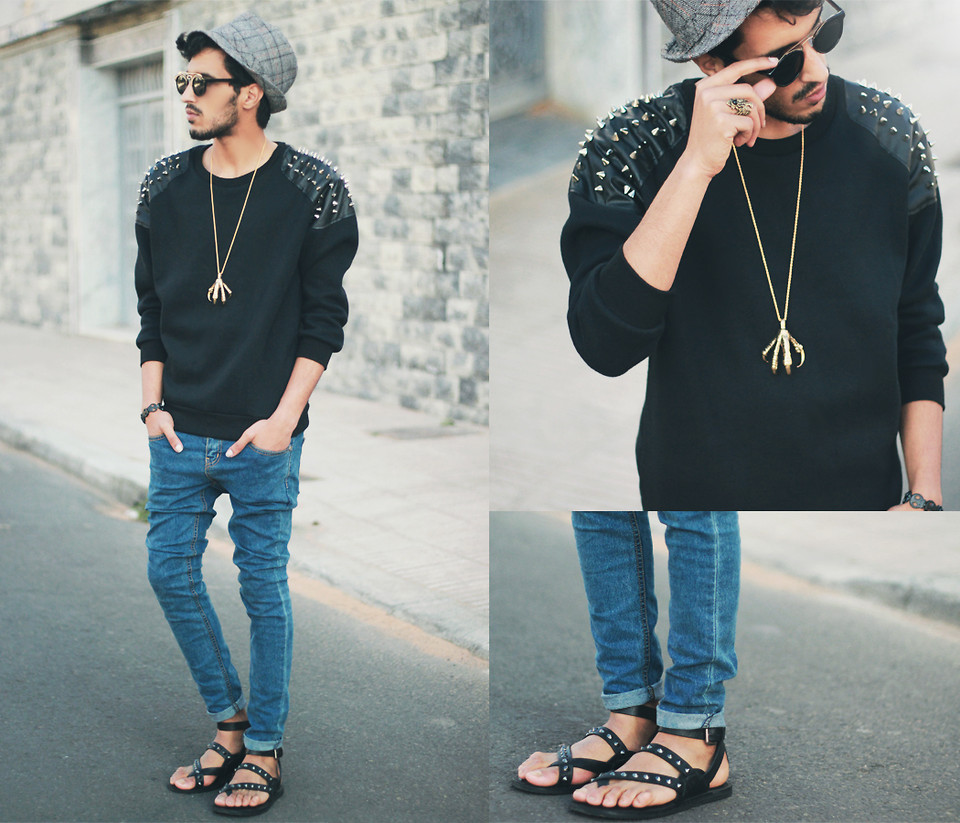
Take a bold step and spruce up your own wardrobe this season with spiked accents. When it comes to beauty and fashion trends, few fashionistas know better than mega popular YouTube sensation, Michelle Phan. Originally one of YouTube’s rising beauty video bloggers, Michelle Phan now boasts over 7 million YouTube subscribers. She has even penned her own book about beauty advice and has collaborated with some of the most esteemed designers in the business. Here, we’ll follow in the steps of Michelle Phan with a fun and easy DIY tutorial on how to add spikes to a sweatshirt.
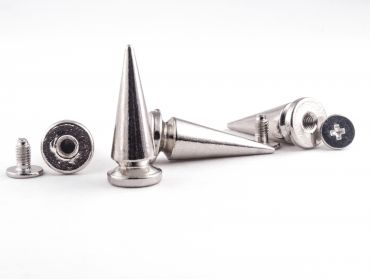
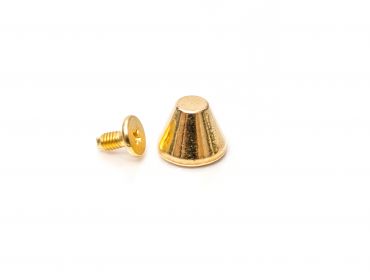
Let’s face it, we can get bored with using our favorite staples season after season. Add a little life and energy into a boring sweatshirt by jazzing it up with a few studs or spikes. First, assemble your supplies like a set of spikes from MJTrends.
- Before you get started, decide what type of design you would like to create. Maybe you want to go all out and create a geometric pattern along the back, or just add a few simple rows on the shoulder area.
- Once you decide on your overall design, you can go ahead and get started. Pinpoint the spot where you want to add your first stud, then use a seam ripper to make a small hole. Avoid making it too big, because it could cause the stud to fall right through.
- Poke the bottom part of the stud through, and then twist the other end of the stud to keep it in place.
- Repeat this step for each stud until you complete your design.
Easy, fun and totally cool, this do it yourself stud tutorial is made for you! Stay edgy and stylish this fall with this cool spike DIY tutorial.
Written by Jade Nicolette


Matching Products:
Long silver spikes

Silver fashion spikes
Gold mushroom stud


Honestly, adding spikes to revive an old sweatshirt sounds more fun than shopping for a new one. The tutorial makes it seem like a quick weekend project.
I like that the article offers both subtle and bold design options, from a few rows on the shoulders to full geometric backs. It makes the project feel flexible for different styles.
The emphasis on gathering supplies first, especially specific spikes from MJTrends, makes the process feel organized rather than chaotic DIY guessing.
The seam ripper technique is a clever workaround compared to forcing studs through fabric, which usually stretches or damages it. That tip alone makes this guide worth reading.
Michelle Phan’s transition from beauty videos to influencing fashion DIY is pretty cool, and this tutorial reflects that creative crossover nicely.
It’s helpful that the article acknowledges people get bored with wardrobe staples, because that’s exactly when a DIY like this becomes appealing.
The step about twisting the stud to lock it in place seems straightforward, but I’m glad it’s included because that’s not obvious if you’ve never worked with spikes before.
I didn’t realize how simple it could be to add studs, just making a small hole and securing it. The process sounds beginner-friendly without special tools.
It’s interesting how Michelle Phan’s brand extends beyond makeup into fashion customization, and this tutorial reflects that creative expansion well.
Adding just a few studs on the shoulder instead of going all out seems like a smart way to test the style without committing to a full redesign.
Using a basic staple like a sweatshirt and transforming it with spikes is such a practical idea. It’s a nice way to refresh something you already own instead of buying new pieces.
The step-by-step repetition for each stud makes the project sound meditative in a way, not just a quick fix but something you can take your time with.
I appreciate the caution about hole size because fabric integrity is easy to overlook. That kind of detail shows the tutorial was written with actual trial and error in mind.
The contrast between a basic sweatshirt and edgy spikes is what makes this project appealing. It’s a small change that really shifts the overall vibe.
The reminder not to make the hole too big stood out because that’s exactly the kind of mistake I’d make rushing through. Simple detail but really important for keeping the studs secure.
The idea of creating a geometric pattern along the back feels very on-trend, especially for fall layering pieces. It’s a statement without needing a whole new outfit.
The suggestion to map out your design before starting is something I usually skip, but it clearly matters for symmetry and overall look here.
Following Michelle Phan’s influence into fashion DIY is interesting, and this guide makes it feel approachable instead of intimidating. The shoulder row option seems like a good starting point for beginners.
I like how the tutorial breaks down using a seam ripper to make small holes, that tip alone probably saves a lot of ruined sweatshirts. The geometric pattern idea on the back sounds especially bold.
I appreciate how the article suggests planning your design first instead of just randomly placing spikes. Thinking about layout like geometric patterns versus shoulder accents makes the end result feel more intentional.