How to attach a zipper to Latex
Ever wanted to learn how to attach a zipper to latex material? Check out this informative tutorial provided by Latex Jim on YouTube. We decided to learn more about the process from a DIY YouTube tutorial from LatexWorkshops.
Founded by Goldust, LatexWorkShops officially began in 2007, which was the first latex workshop held in the United Kingdom. Their mission is to help create latex clothes by providing helpful do it yourself tutorials and information regarding latex.
- First, select a zipper style that you prefer, whether it’s a plastic zipper, a stainless steel style or a pre-made zip. For this tutorial, they decided on using a plain zipper that is approximately 22 cm in length.
- Mark your latex using a ruler and a piece of chalk.
- Then, cut straight down the center of the fabric, working slowly to ensure a precise cut.
- Next, you’ll need to apply the zipper to the center. If you’re using a metal zip, there will be stoppers along the edges of each part of the zipper.
- Cotton will not stick to latex, so you’ll need to cover the zipper tape (the woven part) with glue. Apply glue along either side of the zipper and wait for it to dry.
- Before you attach the zipper, make sure to insert the slider to either side of the zipper in order to create a stopper. The wider part will usually face upwards, but it’s not a requirement.
- After gluing, you might need to shape the edge of the zipper using scissors or an exacto knife.
- Next, measure and trace out another shape of the zipper onto another piece of latex. This will act as the stress point guard. Then, you’ll need to create a barrier for the seam line before you attach the zipper.
- Lightly attach the zipper, and then apply another barrier before attaching the stress point guard. This will create a nice even effect along the main latex fabric and the zipper.
- Work carefully to attach the stress point guard and the main panel. After that, you’ll need to apply a zip guard, which will help protect the zipper from getting tangled.
- Use your straightedge to create a soft curve and then measure it properly to make sure it will adhere to the fabric. Grab some talcum powder and place it onto the fabric, then apply your glue onto the guard shape and apply lightly to the garment. The talcum powder helps ease the process and reduces the likelihood that the zip guard will get stuck.
- If you have a little extra fabric at the top, don’t stress. You can always trim the top and make it more of a snug fit. Glue the last three teeth, and you’ll be finished.
The final product is totally professional and looks chic as can be. If there’s any bulging, don’t worry, it will reduce with some time.
Written by Jade Nicolette
- Mens latex shirt with zipper.
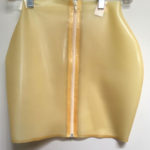
- Transparent latex skirt with zipper.
- Zipper on latex top and skirt.


 Email App


No Comments