

Vinyl rainwear is both stylish and practical, offering protection from the elements while maintaining a modern, sleek aesthetic. For those who appreciate custom clothing or want to create a unique, personalized look, making your own vinyl raincoat or rainwear can be an exciting project. MJTrends is a well-known supplier of quality clear vinyl materials, perfect for this kind of DIY endeavor. This essay will guide you through the process of making your own vinyl rainwear from MJTrends clear vinyl material, covering essential tools, techniques, and tips for success.

Materials and Tools
Before you begin, gather all the necessary materials and tools to ensure a smooth workflow. Here’s a list of what you’ll need:
Materials:
- MJTrends clear vinyl material: Available in different thicknesses (4-gauge to 30-gauge), the thickness you choose depends on the type of rainwear. For lightweight raincoats, 8-gauge to 12-gauge vinyl works best; for more structured garments, 16-gauge and above is suitable.
- Thread: Use heavy-duty polyester thread, as vinyl can be quite tough to work with.
- Bias tape or seam binding: This helps finish seams neatly and makes the rainwear more durable.
- Snaps, zippers, or buttons: These are used for closures. Snaps are often preferred for rainwear as they are durable and waterproof.
Tools:
- Sewing machine: A machine with a non-stick foot or Teflon foot is ideal, as vinyl tends to stick to metal feet.
- Scissors or rotary cutter: Ensure these are sharp enough to cut through vinyl cleanly.
- Measuring tape: For accurate measurements.
- Pins or fabric clips: Use binder clips or fabric clips instead of pins, as pins can leave permanent holes in vinyl.
- Chalk or washable marker: For marking your pattern on the vinyl.
Step-by-Step Process


1. Choosing the Right Vinyl
Vinyl comes in various thicknesses, or gauges, and the choice of gauge depends on the style and purpose of your rainwear. MJTrends offers clear vinyl in a range of options. For a lightweight, packable raincoat, opt for an 8- to 12-gauge vinyl. If you’re making a structured rain jacket or a longer trench coat, a thicker 16-gauge or 20-gauge vinyl will provide more durability and structure.
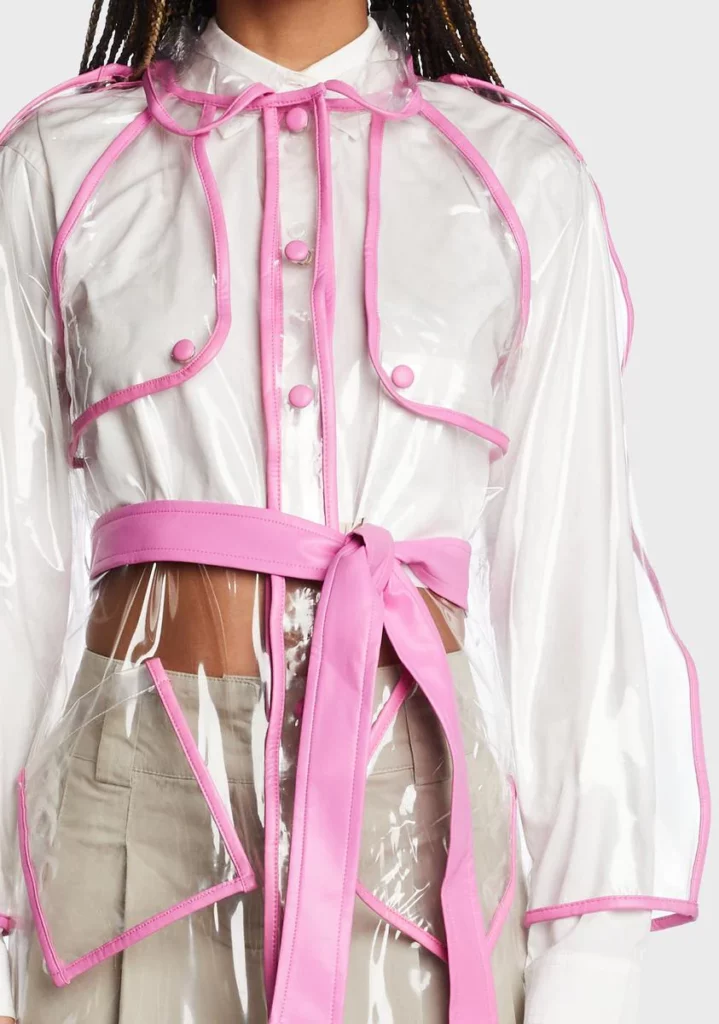
Clear vinyl has the added bonus of being versatile for design. You can incorporate colorful trims, snaps, or even fabric panels underneath to create a layered, dimensional look. Since the material itself is waterproof, it’s ideal for rainwear that can stand up to the elements while looking fashionable.
2. Drafting or Choosing a Pattern
Once you have selected your vinyl, the next step is to choose or draft a pattern. You can use a commercial sewing pattern specifically for rainwear or modify an existing jacket or coat pattern. Patterns for raincoats often include raglan sleeves, wide hoods, and roomier silhouettes, allowing for layering underneath. Simpler designs with fewer seams are preferable when working with vinyl, as this material doesn’t breathe well, and excess seams can complicate sewing.


Make sure to consider these elements when selecting a pattern:
- Hood or collar: A wide hood is essential for rainwear, helping to shield your head and neck from the rain.
- Length: Decide if you want a long trench-style coat, a shorter jacket, or even vinyl rain pants to accompany your raincoat.
3. Cutting the Vinyl
Vinyl can be tricky to handle because it tends to shift, and pins can leave marks. Instead of using pins, weigh down your pattern pieces on the vinyl or use fabric clips to keep the material in place. Use sharp scissors or a rotary cutter to get clean, precise edges. It’s crucial to cut carefully, as mistakes in vinyl cutting are harder to fix compared to traditional fabrics.
Also, remember to leave adequate seam allowance, especially since you will need to seal or reinforce the seams later to prevent water leakage.
4. Sewing Techniques for Vinyl
When sewing vinyl, there are a few essential techniques to keep in mind:
- Use a Teflon foot: Vinyl tends to stick to regular sewing machine feet, so using a Teflon or non-stick foot will help the fabric glide smoothly.
- Adjust the stitch length: Vinyl can perforate easily, so using a longer stitch (around 3-4 mm) prevents the material from tearing along the seams.
- Use clips instead of pins: Since pins can leave permanent holes in the vinyl, use fabric clips or binder clips to hold pieces together.
- Reinforce seams: Because vinyl rainwear will be exposed to wet conditions, reinforce your seams. You can do this by binding the edges with bias tape or seam binding, which also makes the inside of the garment more comfortable to wear.
5. Sealing the Seams
To make your rainwear fully waterproof, you’ll need to seal the seams. There are a few different methods for sealing seams:
- Bias tape: Sewing bias tape along the seams will not only strengthen the seam but also prevent water from seeping through.
- Clear vinyl seam tape: You can apply clear vinyl tape to the seams on the inside of your garment for additional waterproofing.
- Heat sealing: This method requires a special heat tool or iron with a protective cloth, which can fuse vinyl seams together. Be cautious not to overheat or melt the vinyl.
6. Adding Closures
For rainwear, closures are critical. Snaps, buttons, or zippers all work, but snaps are often the most waterproof and easiest to work with for vinyl garments. MJTrends offers snap kits that you can use with their clear vinyl.
When attaching zippers, consider using a waterproof or water-resistant zipper. Install the zipper carefully to avoid puckering, and reinforce it with tape if needed to ensure no water can seep through.
Finishing Touches and Customization
Once you’ve sewn the main body of your rainwear, there are several finishing touches you can add to personalize your creation. Consider trimming your raincoat with contrasting bias tape for a pop of color or adding reflective strips for nighttime visibility. You can also include pockets made from vinyl or contrasting fabric to create a functional yet fashionable design.
Additionally, customize the fit by adding drawstrings or elastic around the hood, cuffs, or waist. These will help keep out the wind and rain, ensuring your vinyl rainwear is both stylish and practical.
Conclusion
Making your own vinyl rainwear from MJTrends clear vinyl material is a rewarding DIY project that allows you to combine functionality with fashion. By selecting the appropriate vinyl gauge, using the right sewing techniques, and paying attention to details such as seam sealing and closures, you can create a unique, waterproof garment tailored to your personal style. Whether you’re aiming for a minimalist clear raincoat or a bold, edgy rain jacket with colorful accents, the possibilities with clear vinyl are vast. With patience and creativity, your DIY rainwear will be a standout piece in your wardrobe.


It’s helpful that you mentioned using heavy-duty polyester thread, since standard thread really struggles with thicker gauges like 16 or 20.
Pointing out that clear vinyl can shift while cutting was useful, and using weights or clips instead of pins seems like a simple but effective solution.
I hadn’t thought about using heat sealing as an option, but the caution about overheating the vinyl is definitely something to take seriously.
Explaining that cutting mistakes are harder to fix with vinyl was a good reality check, and it makes me want to take more time during the cutting stage.
I appreciated the clear breakdown of vinyl gauges, especially the 8-12 for lightweight coats versus 16+ for structure, since that’s something most tutorials skip over.
Adding reflective strips as a finishing touch is a smart idea that combines style with safety, which isn’t always considered in fashion-focused tutorials.
The suggestion to keep patterns simple with fewer seams makes a lot of sense given vinyl doesn’t breathe, and it’s a good design constraint to keep in mind.
I found the section on closures helpful, especially the point about snaps being more waterproof and easier than zippers for this type of material.
I like how you highlighted seam sealing options like bias tape versus clear seam tape, since waterproofing is usually glossed over in DIY rainwear guides.
I didn’t realize how important stitch length is with vinyl until you mentioned 3-4 mm to prevent perforation, which explains why my seams used to tear.
The reminder to use clips instead of pins saved me from ruining a previous project, and it’s nice to see that emphasized alongside the Teflon foot tip.
Using MJTrends clear vinyl with colorful trims or layered fabric underneath is a fun idea, and it really expands the design possibilities beyond just plain transparent coats.
The advice about leaving enough seam allowance for sealing later is practical and something I’ve overlooked in past sewing projects.
Vinyl rainwear: functional, yes. Stylish? Debatable. Crafting your own may offer control over quality and fit, but consider the environmental impact of PVC. It’s known for its durability but also for its ecological footprint. Ensure proper ventilation when working with adhesives; toxic fumes are a health risk. Remember, while DIY projects can be empowering, they also carry responsibilities—both to oneself and the environment.
The note about using a non-stick or Teflon foot is crucial because vinyl sticking to the presser foot is one of the most frustrating issues beginners run into.
I like the idea of adding drawstrings or elastic at the cuffs and hood to keep out wind and rain, which makes the garment more functional overall.
The inclusion of hood design and roomier silhouettes for layering shows a good understanding of how rainwear actually gets used in real life.